
[백준/튼튼한기본기] 2501번: 약수구하기
2022. 9. 9. 23:40
컴퓨터/코딩테스트
[문제] [내 코드] n, k = map(int, input().split()) try: answer = [num+1 for num in range(n) if n%(num+1) == 0][k-1] except: answer = 0 print(answer) - 메모리 30840KB, 시간 68ms - 정수 n이 주어질 때마다 약수 리스트를 생성해서 (k-1)번째로 인덱싱했다. 인덱싱 되지 않으면 k가 정수의 개수보다 큰 걸로 간주한다. - 주어지는 정수 n마다 리스트를 생성해야 하기 때문에 별로 효율적이지 않은 것 같다. - try-except 문은 최대한 쓰지 않는 게 좋을 것 같아서 for문으로 다시 작성해보기로 했다. n, k = map(int, input().split()) for num in ra..
[백준] 입력/input값 받기
2022. 9. 9. 23:19
컴퓨터/코딩테스트
코딩테스트 준비를 시작한다. 이 티스토리글을 기반으로 차근차근 해나갈 예정이다. 백준 문제를 풀기 위해서는 input 값을 받아와야 하는데, 아래 코드를 활용하면 된다. # 가장 기본 # string으로 입력된다는 점을 기억하자 a = input() # 한 줄에 두 개 이상의 값 [a, b] = input().split() l = [i for i in input().split()] # 정수값으로 받아오는 방법이다 a, b = map(int, intput().split()) # 혹은 import sys a, b = map(int, sys.stdin.readline().split())

ROMP inference 를 위한 환경 세팅
2022. 8. 12. 11:20
컴퓨터/Docker
1차 시도 docker image docker pull nvcr.io/nvidia/pytorch:19.10-py3 NVIDIA CUDA 10.1.243 docker container NV_GPU=1 docker run --runtime=nvidia --name bernice-romp --shm-size 4G -it -v $(pwd):/workspace -v $(readlink -f disk1):/disk1 nvcr.io/nvidia/pytorch:19.10-py3 /bin/bash python -V # python import torch print(torch.__version__) print(torch.version.cuda) Python 3.6.9 :: Anaconda, Inc. 1.3.0a0+24ae..
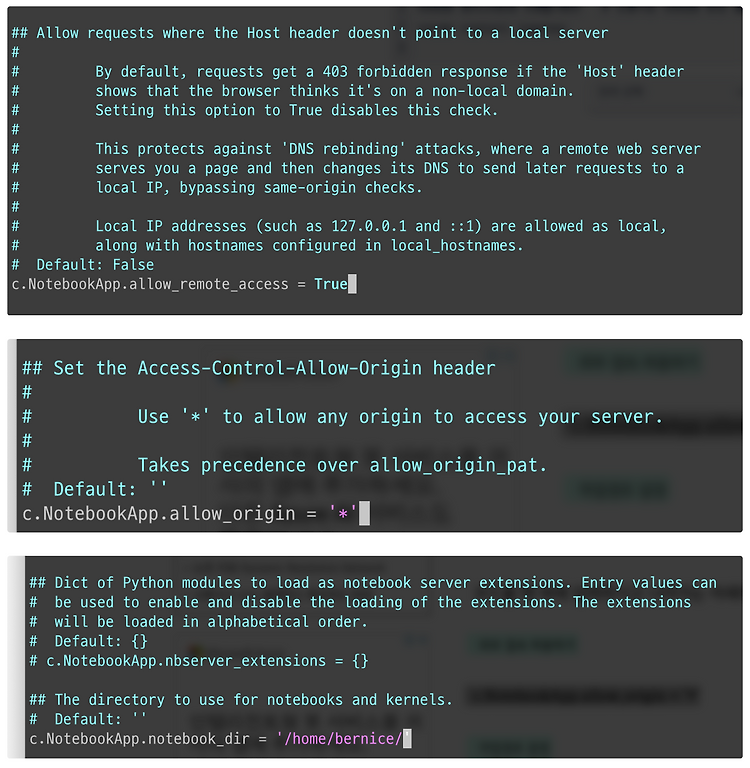
Jupyter Notebook over SSH
2022. 8. 12. 11:00
컴퓨터/Cloud, Server
conda activate romp-env # 만들어둔 conda 환경 활성화 conda install jupyter jupyter notebook --generate-config # ~/.jupyter/jupyter_notebook_config.py 생성됨 아래와 같이 수정 jupyter notebook --port=9000 --config jupyter_notebook_config.py --no-browser & ssh -N -f -L 8888:localhost:9000 bernice@ 그 다음 로컬 브라우저에서 localhost:8888 접속 jupyter notebook list token= 뒤 내용 입력
AWS 시작하기
2022. 8. 12. 10:43
컴퓨터/Cloud, Server
AWS 관리콘솔에 접속하기 : AWS 관리콘솔 > 모든 서비스 > 컴퓨팅 > EC2 [오른쪽 상단 리전 설정] 주로 오레곤 or 오하이오 서울의 ‘cvat-tool’은 레이블링하는 서버 .. [EC2] 원격으로 컴퓨터를 키고 끄는 것이라고 생각하면 됨. 미리 설정한 이미지대로 실행됨. AWS에서 미리 준비한 딥러닝 AMI를 쓰고 있음. conda 기반 환경이라고 함. 필요한 팩키지만 더 설치해서 바로 쓰는 식. 참고 : https://aws.amazon.com/ko/machine-learning/amis/ Deep Learning AMI - Amazon Web Services AWS Deep Learning AMI는 기계 학습 담당자 및 연구원에게 규모와 관계없이 클라우드에서 딥 러닝을 가속화할 수 있는..
emoji crawling
2022. 8. 12. 10:00
컴퓨터/python
🤦♀️ People & Body Emojis url = 'https://emojigraph.org/people-body' response = requests.get(url).text.encode('utf-8') response = BeautifulSoup(response, 'html.parser') div_contents = response.find('h2', text='Person').findParent() big_urls = [] for link in div_contents.findAll('a'): tail = str(link.get('href')) big_urls.append('https://emojigraph.org'+tail) small_urls = [] for l in range(len(bi..
config 설정으로 편리하게 서버 접속하기
2022. 8. 11. 23:59
컴퓨터/Cloud, Server
매번 아래와 같이 접속하는 대신에 ssh -p @ ~/.ssh/config 파일에 내용을 추가해서 Host persephone Hostname -- Port 1234 IdentityFile ~/.ssh/id_rsa User bernice LogLevel QUIET Ciphers aes128-ctr,aes192-ctr,aes256-ctr Compression yes ForwardX11 yes ForwardX11Trusted yes ssh persephone 로만 접속하는 방법이 있다

tmux - 원격으로 접속하기
2022. 8. 11. 23:57
컴퓨터/BASIS
동일한 tmux session에 접속하면, 로컬 컴퓨터로 사무실 모니터를 원격 프로그램처럼 조종할 수 있다. 따라서 로컬 컴퓨터에서 입력하는 대로 사무실 모니터에서 원격으로 명령어를 입력하는 것이 가능하다. 문제는 tmux session 을 로컬에서 열었을 때, unsupported graphic card 에러가 발생하면서 블렌더 gui 가 열리지 않는다는 점이었다. 반면에 사무실 모니터에서 실행시킨 tmux session일 때는 GUI 가 작동한다. 더욱이나 블렌더 gui를 docker container 위에서 실행시킨다는 점에서 문제가 더 복잡했다. docker-compose.yml 블렌더를 위한 docker container 실행 옵션은 위와 같다. environment 인자를 통해 “DISPLAY..